Your welcome page and the clearance steps you need to complete before you can log hours.
Welcome to FieldX! Before you can log hours or access your placement, you need to complete the Clearance Process. These are the steps your program requires before you can participate in supervised field experience. Your program may require updates for a new term or a change in placement.
The first time you click Field Experience in the sidebar, you’ll land on the Welcome to FieldX page (at /fieldx-get-started). Before you start paperwork, the welcome page shows three step cards:
Find a site — secure a placement at a clinic, school, or agency
Complete paperwork — complete your program’s clearance requirements
Track hours — log field experience hours after approval
At the bottom there’s a Start Paperwork button. Click it to begin.
If you’ve already started clearance, the page replaces the three cards with Continue Paperwork. When clearance is required for a new placement, it offers Complete Clearance. Your program may also show a Document Center with shared reference materials.
Returning students can reopen their existing clearance flow with Continue Paperwork.
If you skip the welcome screen and click straight into a Field Experience tab, you’ll see a locked screen. This is expected — it means your pre-application (clearance) hasn’t been approved yet. Almost every action in FieldX — logging hours, accessing your cohort, viewing placement details — requires clearance approval first.
If you see tabs like Discover, Presenting Issues, or My Courses instead of a locked screen, you’re in the SimCare Simulations area, not FieldX. Go back to the main navigation and click Field Experience to reach FieldX.
Once your clearance is approved by your Program Admin, the lock lifts and stays lifted for that placement.
If your Program Admin later moves you to a new placement (a different level such as Practicum → Internship, or a different track type), your program may require re-clearance for the new placement. You’ll see a blocked screen explaining the change, with a button to complete the clearance tasks again. Your uploaded sites and insurance carry over; you’ll only need to redo handbook and agreement steps.
Some programs require students to redo clearance at the start of each new term. If your program has this turned on:
If you’re not currently in an active placement when the new term starts, your Field Experience re-locks with a message like “A new term has started. Please complete clearance tasks again for this term to continue.” Complete the flow again to unlock.
If you’re already in an active Practicum or Internship when the new term starts, you’re not blocked. You keep logging hours as usual, and you’ll see a small red dot on the Clearance Tasks button as a reminder to complete the new term’s clearance when you have time.
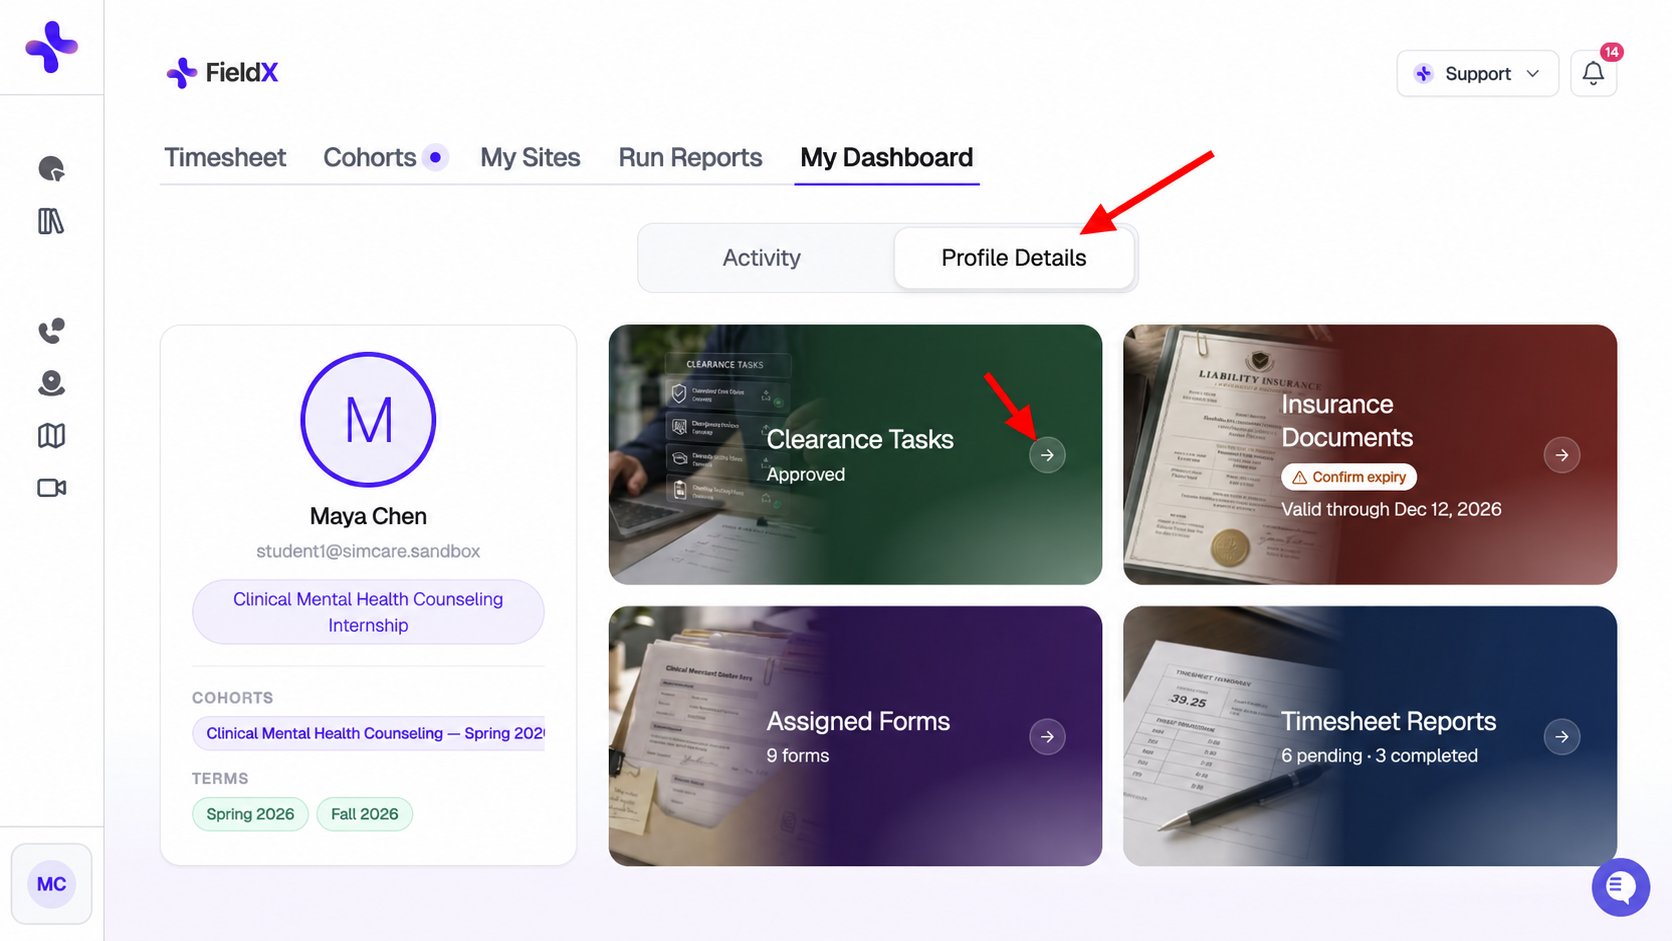
On the Welcome page, click Start Paperwork, Continue Paperwork, or Complete Clearance, depending on your status. You can also use the Clearance Tasks button on Timesheet to open the clearance flow. My Dashboard → Profile Details → Clearance Tasks lets you review your status and application history.
Review your clearance status from My Dashboard, under Profile Details.
2
Select your term and track
Choose your term and your track (Internship, Practicum, Pre-Practicum, etc.). Your track determines which application steps and requirements appear next, so double-check both before continuing.
Choosing a term, then a track.
Terms whose application window has closed are shown but grayed out — contact your Program Admin if you need an extension.
3
Complete the required steps
FieldX shows the application requirements for your track and program. Depending on your track, these may include:
Step
What you do
Agreements
Read and sign any required program agreements
Select Sites
Pick from the established sites list, or use Propose Site to request a new one. Some programs only allow new-site requests here — not later on My Sites.
Add Supervisors
Pick from the list, or click Add new and Invite Site Supervisor. Some programs only allow inviting a new supervisor here — not later from Timesheet Actions or My Sites.
Liability / Insurance
Upload your liability insurance certificate and review the detected expiration date
Custom forms / quizzes
Some programs add their own forms or quizzes at this step
Complete each required step in full before moving on to the next.If your application includes Liability, use Browse files to upload your current insurance certificate. FieldX reads its expiration date automatically. Compare that date with your certificate, then select That’s correct or use Change date to correct it. Scan again reruns the date scan. The confirmed date is used for renewal reminders.
Your program determines the steps shown. On Liability, upload a certificate and confirm its expiration date.
4
Wait on any required signatures
Some steps need a signature from someone else — your site supervisor, faculty member, or Program Admin — before you can move on. FieldX marks these Waiting for signature(s), and you can’t submit your final application until every required signature is in.The signer gets an email automatically, but it’s worth reaching out to them directly too while you wait.
A form waiting on signatures from other parties.
For details on how to pick signers, track their progress, resend invitations, or swap a signer out, see Multi-person forms and signers below.
5
Monitor your application status
Come back to FieldX any time to check whether required forms have been signed. Once every required step and signature is complete, Submit Application becomes active.
Reviewing application status before submitting.
6
Submit for review
Once every required step is complete, click Submit Application. Your clearance tasks are sent to your Program Admin for review.Need to change something after submitting? Click Edit, update the information, and resubmit.
Submitting the completed application.
7
Wait for approval
Your Program Admin reviews each application. You’ll get an email when you’re approved (or when something needs to be corrected). If you’re rejected, the Program Admin’s note is visible at the top of the clearance page so you know what to fix.
Your application is locked to the set of clearance tasks that existed when you created it. If your program adds, removes, or reorders tasks while you’re mid-application, your step list doesn’t change on its own — you keep working against the requirements you started with.If your coordinator asks you to pull in the new requirements, use Update to latest requirements:
1
Open the application menu
On the Clearance Tasks page, click the menu button at the top of the step sidebar.
2
Click Update to latest requirements
A confirmation dialog explains what will happen. Everything you’ve entered is kept — your track, sites, agreements, supervisor contacts, uploads, and completed form steps stay exactly as they are.
3
Complete any new tasks
New requirements appear in your step list as unanswered tasks. You must complete them before you can submit.
What happens to each kind of step:
Steps in both versions — untouched. Your answers keep working as-is.
Newly added steps — appear unanswered and become required before you can submit.
Removed steps you already completed — stay visible in the sidebar with a No longer required caption. Your answer is shown read-only rather than deleted, but it no longer counts toward completion.
Update to latest requirements is available while your application is in progress or awaiting review. If your application is already submitted, updating reopens it for editing and you’ll need to submit again after completing any new tasks. Approved applications pick up the latest requirements automatically when you use Update Application.
Don’t confuse this with Start over from scratch in the same menu — that wipes every answer. Update to latest requirements deletes nothing.
Some clearance steps aren’t finished when you submit — they need one or more other people (your supervisor, faculty, a school principal, a preceptor) to complete their portion before the step is done. These are multi-person forms. You’ll see this flow inside Clearance Tasks whenever a step is labeled with more than one required role, and you’ll see the same waiting screen and controls again if you update an approved application.
When you open a multi-person step, the form shows a Signers section above (or in place of) the form fields. For each required role, one of the following appears:
Signer type
What you do
Supervisor
Search your placement site’s approved supervisors and select one. If none exist yet, go back to the Add Supervisors step and click Add new, or use Add on the My Sites card if you have it. Some programs hide that My Sites Add button.
Faculty / Teacher
Pick from the faculty assigned to your track. You cannot enter faculty manually — if your list is empty, contact your Program Admin.
Program Admin
Pick from the Program Admins in your track. Manual entry is not available.
Custom signer (for example Principal, Preceptor)
Enter the person’s full name and email. They don’t need a SimCare account — they’ll get a link by email.
Some steps have fixed custom signers pre-set by your Program Admin (for example a specific district contact). In that case you’ll see the name and email displayed as read-only — you don’t need to enter anything.
If a supervisor role has candidates you don’t recognize, click Enter manually to type in a name and email instead. Faculty and admin roles are locked to the list your program provides.
After you fill in your section and pick your signers, click Submit & Notify Signers. SimCare emails each signer a link to the section they own. You’ll then land on the Waiting for signer(s) screen, which lists each site, each signer, whether they’ve completed their portion, and when their invitation was sent.
You can move on to other clearance steps while you wait, but you can’t submit your final application until every required signer has completed their part.
The waiting page refreshes automatically as signers finish, so you don’t need to reload it manually.
If your placement includes more than one site and the step requires a signer per site, you’ll see a stepper at the top showing one entry per site (for example Site 1 of 3). Fill the form out for the current site, submit it, and the stepper advances to the next site.
You’ll sign the same form once per site. Your answers for one site don’t carry into the next — each site can have different responses and different signers.
From the Waiting for signer(s) screen, each pending signer row has three actions:
Resend email — sends a fresh invitation link to the signer. Use this if they say they never received it or the link expired.
Change signer — replace the pending signer with a different person. For supervisor slots you can pick a different supervisor from your site or enter a new name/email; for custom slots you enter a new name/email. The old invitation is invalidated and a new one is sent.
Clear signer — remove the signer from this form. If they’re the only signer on that form instance, the whole instance is reset; you’ll be warned before this happens.
Signers who have already completed their portion can’t be changed or cleared — their submission stays locked in.
On staggered multi-site forms, if a signer at one of your sites doesn’t actually need to complete this form (for example one placement doesn’t require this signature), open that site’s step and click This signer doesn’t need to complete this form — remove it. The instance is removed and the stepper collapses to the remaining sites.This action is only available on instances where no signer has finished yet.
If you need to change something structural — a different set of signers, a different site — use Start Over (on required steps) or Clear & Continue (on optional steps) at the top of the form:
Start Over wipes your answers and every signer invitation for this step, so you can pick signers again from scratch. Signers who already completed their part will need to redo it.
Clear & Continue discards this optional step entirely and moves you on.
Both actions notify any completed signers that their previous submission no longer counts. Only use them when you actually need to restart — for a small typo, use Change signer or Update Application instead.
Some form templates open in a full-page signing experience instead of inline in the clearance flow. When you see one of those:
1
Open the form
Click Open Form. The form opens in a new page.
2
Complete your section and submit
Fill in the form and submit it there.
3
Return and refresh
Come back to the clearance step and click Refresh Status. The status chip flips from Waiting for Submission to Form Completed once your submission is picked up.
Once you’ve submitted, use View Submission (or Review / Edit after everyone finishes) on the waiting screen to see exactly what you sent for each site. Editing here creates a corrected copy — your Program Admin will need to re-approve the change, the same as with Update Application.
My supervisor never got the email. Ask them to check spam, then use Resend email on the signer’s row. If they still don’t see it, use Change signer to re-enter their email in case there’s a typo.I picked the wrong faculty member. Use Change signer on that row and pick the correct person from the list. The wrong signer’s invitation link stops working.A signer completed their part but I need to change my answers. Use Update Application from the Clearance Tasks page, not Start Over. Update Application carries completed signatures forward so nobody has to redo their work unless you actually change their section.The stepper shows a site that shouldn’t need this form. Open that site’s step and click This signer doesn’t need to complete this form — remove it. If the button isn’t there, a signer has already completed the form for that site — use Change signer or Clear signer instead.
If something about your placement changes after your application is approved — you switched supervisors, added a new site, or your Program Admin asked you to correct a detail — you can update your application without starting over.
1
Open Clearance Tasks
From your dashboard, click Clearance Tasks. You’ll see the Application Approved card with two options: View Application and Update Application.
2
Click Update Application
A confirmation dialog explains that updating starts a new copy of your application pre-filled with your current answers, and that your Program Admin will need to re-approve the changes before they take effect. Click I Understand, Continue to proceed.
3
Change only what you need to
You’re placed at the first step of the clearance flow with every answer already filled in. Move through the steps and edit anything that needs updating.
4
Resubmit for review
On the Finalize step, click Submit Application again. Your Program Admin will review the changes and either approve or reject the update.
Your originally approved application stays active while your update is pending review, so you keep your full Field Experience access the whole time. Nothing switches over until the update is approved.
Multi-person forms carry forward. Any signature or form step you already completed with a supervisor or third party (for example a signed site agreement) is carried forward as already-complete — you don’t need to collect signatures again unless you change something on that step. Steps you never finished the first time reset to blank so you can complete them fresh. See Multi-person forms and signers above for the full signer flow.
My clearance application looks stuck. Check the top of the Clearance Tasks page for a status banner. If it says “Awaiting Approval,” your Program Admin hasn’t reviewed it yet. If it says “Rejected,” scroll down to read their feedback and re-submit after correcting.I can’t find my site or supervisor in the list. On the Select Sites step, click Propose Site to add a placement that isn’t already in your program’s established list. If you’re already approved and don’t see Request New Site on My Sites, that’s expected for some programs — come back here, click Update Application, and propose the site on Select Sites. For supervisors, on Add Supervisors click Add new, then Invite Site Supervisor. After approval, you can also use Add on the My Sites card, or Timesheet Actions → Add Supervisor, unless your program has hidden those — then this clearance step is the path that still works.The lock screen won’t go away even though I submitted everything. The lock only lifts once your Program Admin approves. Check the My Dashboard → Profile Details → Clearance Tasks card for your current status.
Assistant
Responses are generated using AI and may contain mistakes.