


The sidebar tabs
A DocuSeal Templates tab is also available to a small group of allow-listed accounts for building reusable signature templates.
General Information
Set your program name, description, and upload your program logo. The logo appears in the navigation header for everyone in your program.Terms and Tracks
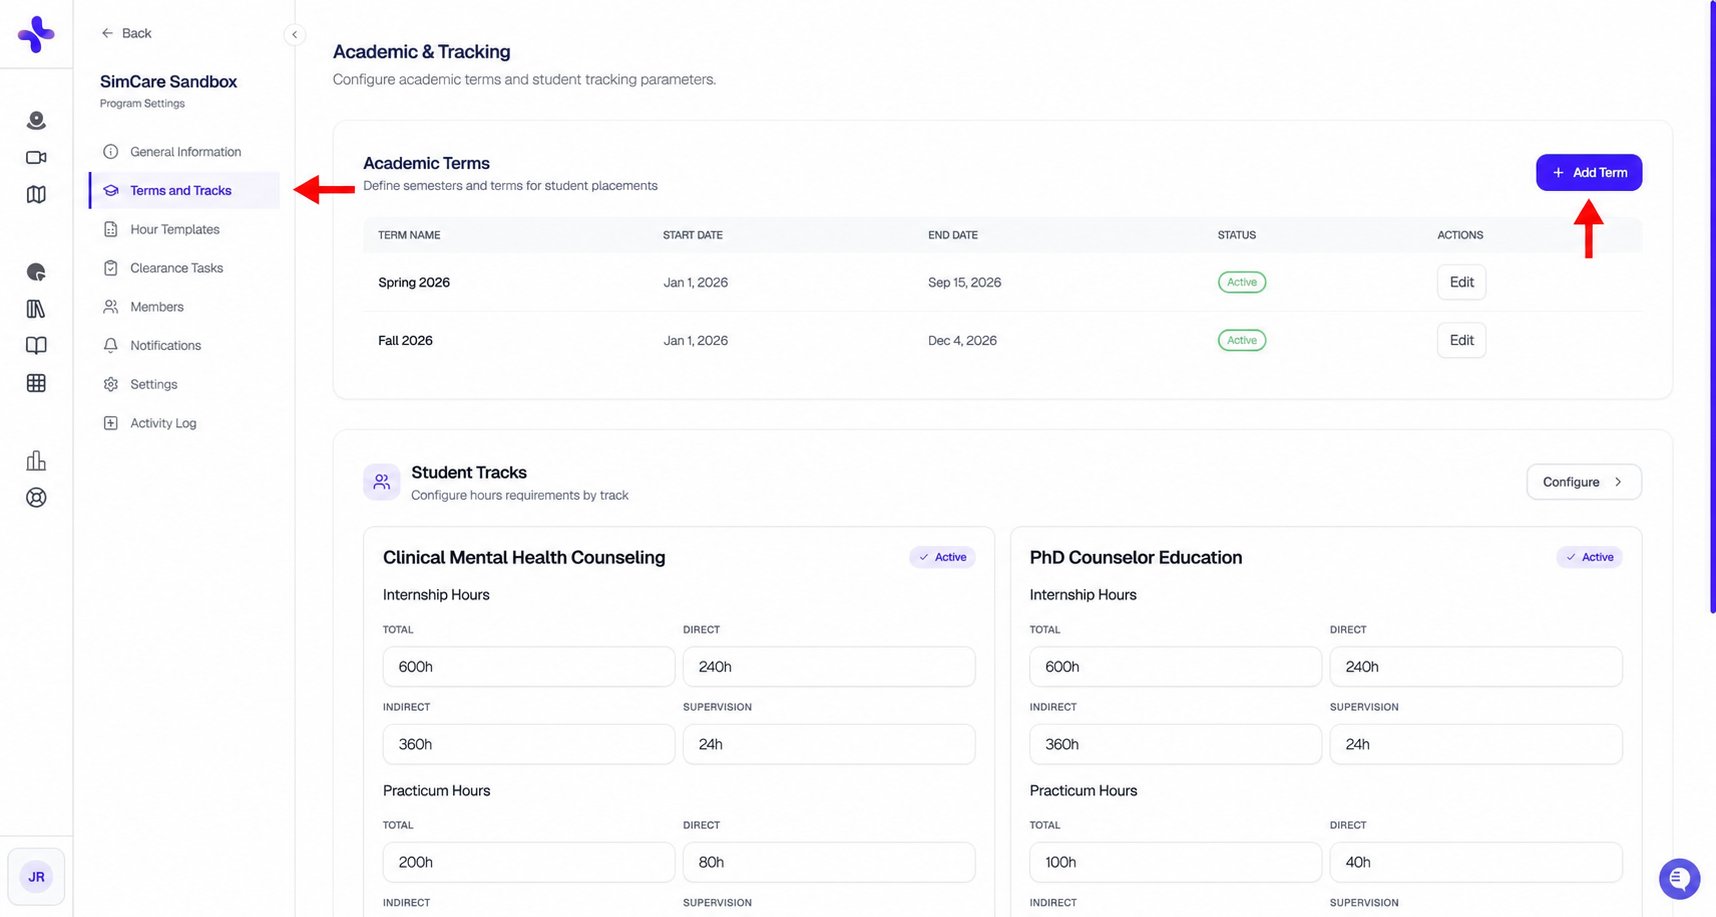
Use Terms and Tracks to manage academic periods and student requirements.
Academic terms
Academic terms control how student progress is tracked across a semester. Each term has a start and end date and is labeled Active, Ended, or Upcoming based on its dates. A disabled term is labeled Inactive. Click + Add Term to create one. You can have multiple terms running side-by-side for cohorts on different schedules.Submission windows (optional)
If your program has Restrict Applications by Submission Window turned on under Settings, each term also has its own Submission Window — an Applications Open From date and an Applications Close On date that gate when new pre-applications can select that term. Leave either date blank for no restriction on that side. A closed term is still visible to students during clearance, but they cannot select it for a new application — you’ll see an Applications Closed chip next to the term status in the table. The submission window is independent of the term’s own start and end dates and never affects students already placed in a term. To adjust several terms’ open and close dates at once, open Program Settings → Clearance Tasks (the Clearance & Placement page) and click Manage Submission Windows in the header.Student tracks
Student tracks define hour requirements for each kind of placement (e.g., Internship, Pre-Practicum, Practicum, Apprenticeship, PhD, Certificate). For each track you can:- Enable or disable the track (this controls what students see in clearance)
- Set required total, direct, indirect, and supervision hours
- Choose qualifying activity types — granular control over which activities count toward each hour bucket
- Configure site requirements
- Pool an internship series into one shared hour requirement — see Pooled hour groups
Pooled hour groups
Some level series can share one combined hour requirement instead of a separate total per level. Two groups support pooling:- Internship I / II / III
- Internship I / II / III – COUC 992/993/994
- Open the track editor and go to the Hour Requirements step. Levels that belong to a poolable group appear together on one card.
- Turn on the pooling toggle on the group’s card. A Pooled badge appears and the member levels collapse into a single hours card.
- Enter the combined required hours — total, direct, indirect, and supervision — for the whole series. If the member levels already have their own totals, FieldX shows their sum as a suggestion you can apply with Use these. Review the suggestion before accepting it: if the levels still hold built-in defaults, the sum reflects those defaults rather than numbers your program set.
- Activity-type minimums still apply. When member levels set different minimums for the same activity, FieldX applies the strictest one across the pool.
- Pooled students don’t get an On Track or Off Pace verdict. A single term’s elapsed time can’t be measured against a multi-term combined total, so their placement status chip stays neutral and they never appear in the Off Pace filter or KPI. Their progress percentage is measured against the pool’s combined requirement instead.
- Turning pooling off is lossless. Each member level’s own hour requirements are restored exactly as they were.
Certificates
Set up Program Certificates with their own hour requirements (e.g., a Trauma certificate that requires N hours of trauma-related direct service). Certificates can be assigned to students individually.Hour Templates
Build custom activity lists, add definitions, preview student choices and hours documents, and assign templates to cohorts. See Custom Hour Templates & Group Supervision for the full workflow, including faculty-led group supervision, required-hour counting, and signing.Clearance Tasks (Application Process)
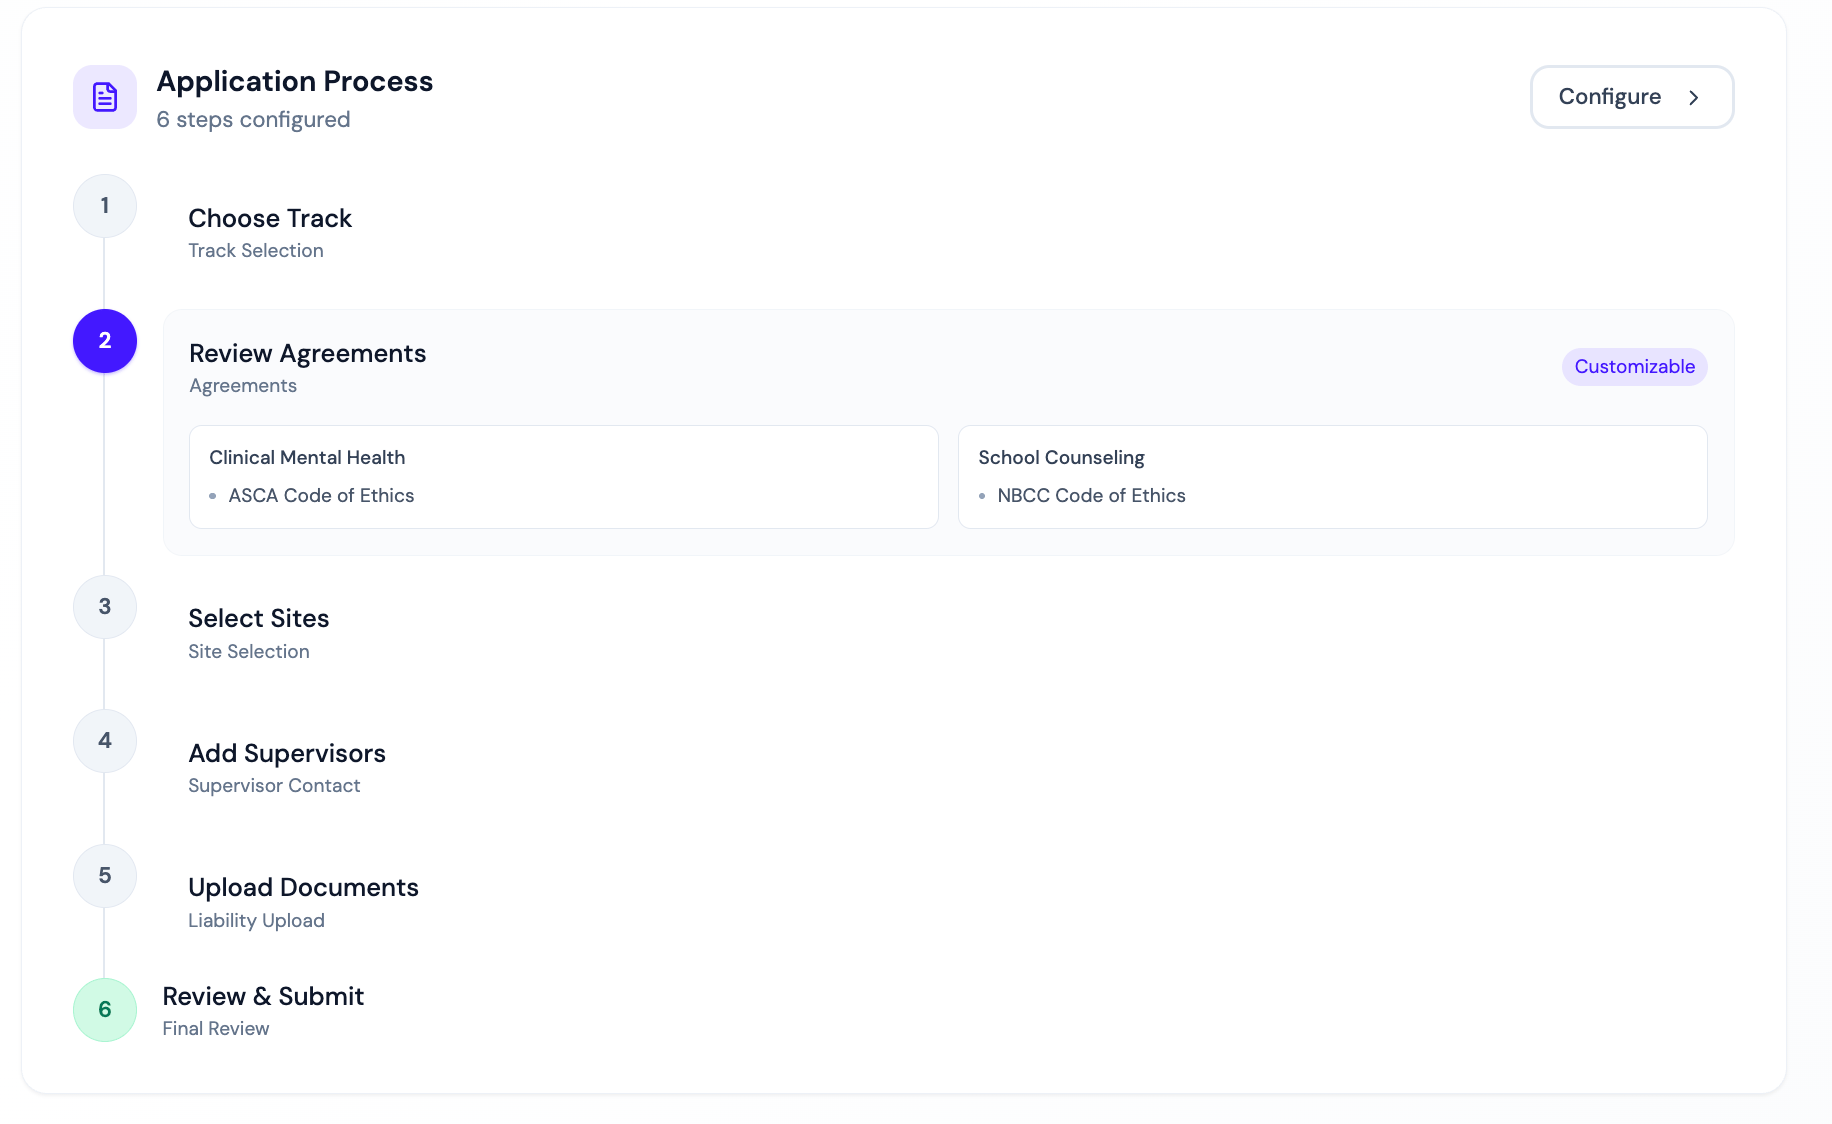
The clearance process determines what students must complete before they can log hours. By default the steps are:- Choose Track — pick their student track
- Review Agreements — read and sign program agreements
- Select Sites — pick an established site or request a new one
- Add Supervisors — provide a supervisor’s name, email, and credentials (triggers the supervisor invite email)
- Upload Insurance — upload a liability insurance form
- Final Review — submit for Program Admin approval
Customizing the process
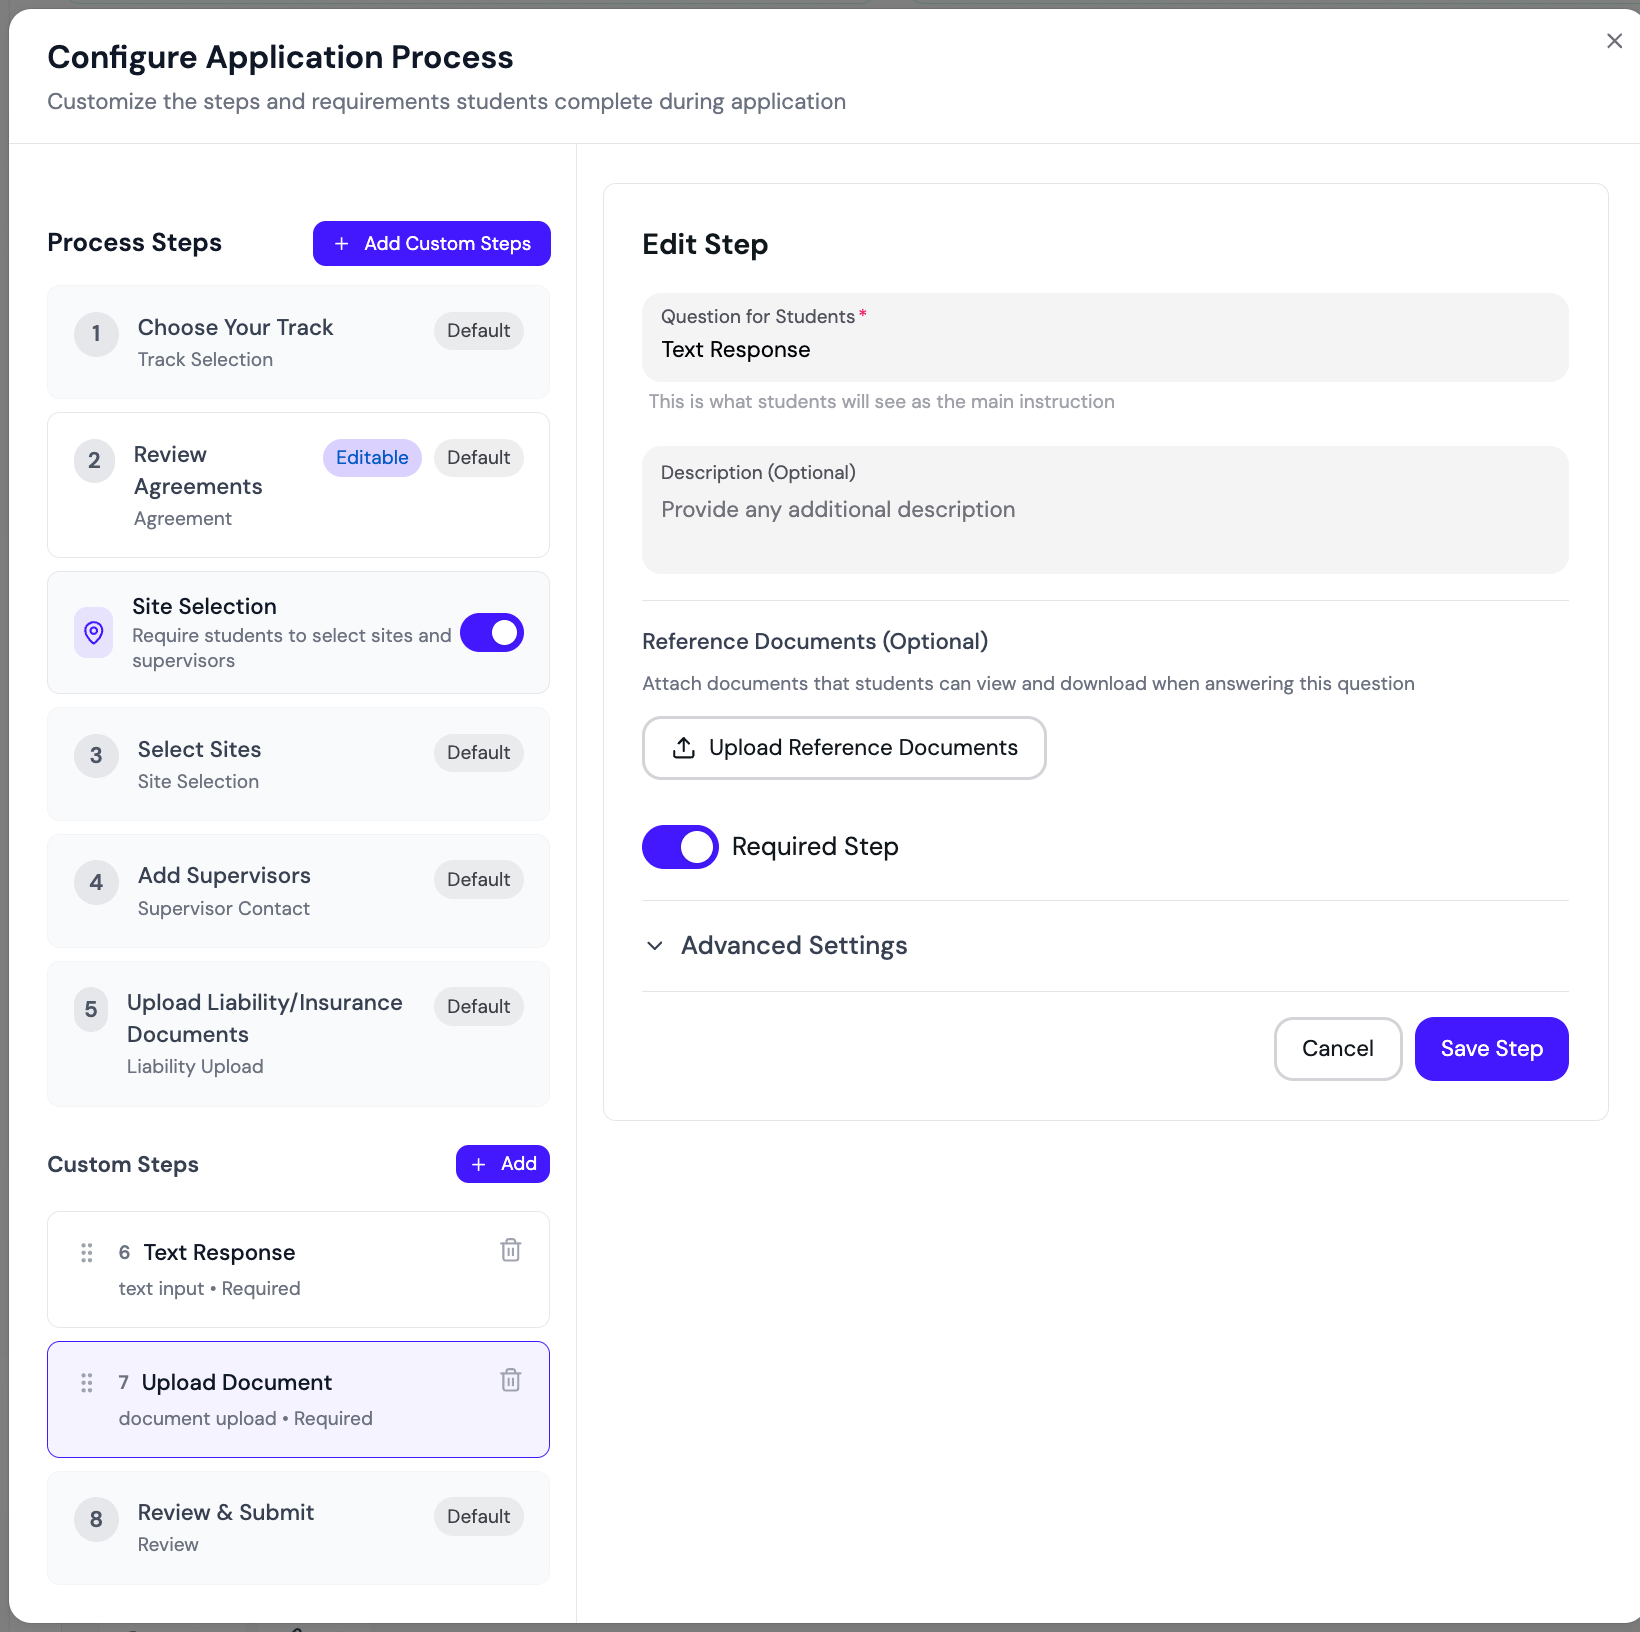
Click Configure Application Process to add, remove, or reorder steps. Available step types includeTrack Selection, Agreement, Site Selection, Supervisor Contact, Liability Upload, Custom Question, and embedded forms or quizzes.
How changes affect existing applications
Each time you save the application process, FieldX snapshots it as a new version. Every student application is pinned to the version that was current when the student created it, so:- New applications use your latest configuration.
- In-progress and submitted applications keep the requirements the student started with. Your edit never retroactively changes an application mid-flight.
- Students with an in-progress or submitted application can pull in your changes themselves via Update to latest requirements in the Clearance Tasks menu. Their saved answers are kept, new steps are added as required, and steps you removed stay visible to them marked “No longer required.”
- Approved students pick up the latest requirements automatically if they later use Update Application.
Members
The Members tab is the canonical roster for your program. See Adding & Managing Faculty & Students.Notifications
Configure Daily Assignment Digest, Insurance Expiration Alerts, Form Due-Date Reminders, Report Due-Date Reminders, Site & Supervisor Change Alerts, and Copy Faculty Supervisors. Select the admins who receive general notifications under Notification Recipients, then click Save Settings. Form and report deadline reminders are configured for 7, 3, and 1 day before the due date and target the person currently blocking progress. See Notification Settings for every option, default, recipient rule, and troubleshooting step.Settings
Program-wide behavior toggles:- Auto-Approve Site Requests — when on, students who request an established program site are approved immediately without Program Admin review.
- Restrict Applications by Submission Window — when on, each academic term can have its own Applications Open From and Applications Close On dates (set on the term under Terms and Tracks). A closed term is still shown to students but cannot be selected for a new application, and you can grant a specific student an extension past a closed date. When off (default), every term is always open for new applications regardless of any dates set on it — the per-term dates are inert until you turn this on.
Re-clearance requirements
Choose which changes require a student to redo the clearance flow. Existing cleared students are not affected — each toggle only applies to changes made after you enable it. All three are off by default.- Placement level changes — when on, moving a student to a new level (for example Practicum → Internship) re-locks that student until they redo clearance for the new level.
- Track changes — when on, moving a student to a new track type (for example CODAC → Clinical Mental Health) re-locks that student until they redo clearance for the new track. See Changing a student’s track.
- New term starts — when on, students are automatically prompted to redo clearance at the start of each new term. Students who are already in an active Practicum or Internship placement are not blocked — they see a red dot on their Clearance Tasks button as a reminder, but can keep logging hours and accessing their placement. Students who are between placements (for example, cleared for a future term but not yet placed) are blocked until they complete the new term’s clearance.
Learning Contract variants
If your program uses Learning Contracts, you can define named variants — each variant pairs a specific draft form with its own final sign-off form. Cohorts then pick which variant their students complete, so a single program can run different Learning Contracts for different tracks or student populations (for example, a standard practicum contract and a separate advanced MSW contract) without maintaining separate programs.Learning Contract variants only appear for programs that have the Learning Contract feature turned on. If you don’t see this section, contact tiko@simcare.ai to enable it.
Defining variants
From Program Settings → Settings, scroll to Learning Contract Variants and click Add variant. Each variant needs four fields:
Click Save at the bottom of the page to persist the list. Every variant needs all four fields filled in before you can save.
Cohorts you don’t explicitly assign a variant to fall back to the standard Learning Contract for your program — you don’t need to add a variant just to keep existing behavior.
Assigning a variant to a cohort
Once a variant exists at the program level, open the cohort, go to Settings → Learning Contract, and choose the variant from the Learning Contract Variant dropdown. Leave it on Program default to use the standard contract. The forms used by the selected variant are listed below the dropdown with a preview link. Changing a cohort’s variant affects Learning Contracts students start from that point on. Contracts already in progress continue with the forms they were started on.Activity Log
A complete audit trail of program activity, with filters for type (Forms, Reports, Timesheets, Application Forms, Page Visits, Supervision Notes, Report Signatures), student, cohort, and date range. Export to CSV.Next step: With your program configured, you’re ready to add users. See Step 1: Adding & managing faculty & students.